Positioning of the looper in the Juki LH-3568A-7 twin needle
This is another of the basic adjustments on this machine. The manual also applies to other models and brands.

We move the left and right plates away

We raise the presser foot and open the bobbins and remove them


We take out the needle plate.
The screw is marked in red, unscrew, and green only slightly loose

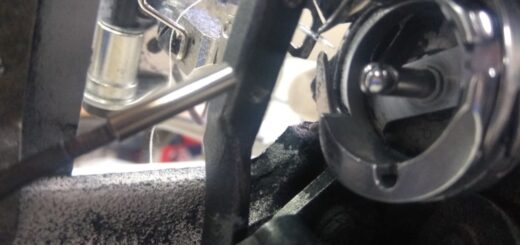
As you can see in the photo a lot of dirt accumulated here.
It must be removed because the machine may not cut the thread through it.

We are setting up the hook.
Set it to the service signs marked on the needle bar.
The cuts are to align with the guide line on the machine.

At this time, the hook should be set up like this.
This illustrates the left side setting, but the right side should be set identically.


The adjustment is made by tilting the machine on the back, then loosen the adjustment screws and set the hook time.
The green arrow is for the left hook and the blue arrow is for the right.

Turning the wheel we have to loosen them all (there are 2 or 3)
Left side

And the right side


The next setting is the distance between the hook of the hook and the needle

We loosen the 2 adjustment screws marked on the pictures and we can move the hook away or closer
The hook point should be at a distance of 0.1-0.05 mm from the needle. In fact, this is not realistic to set and sets itself almost zero. When sewing thick and dense material, even offset from the needle helps.
Note – with this adjustment, the hook time may change relative to the needle
Left side

And the right side

Unfortunately, as you can see the machine was very dirty, but the photos were taken quickly
When inserting the needle plate, remember to hit the notches in the race of the hook because you will hear a loud bang at the start of the machine 🙂